Tuesday, 30 April 2013

Ella's 5th Birthday Cake!!!

So last night I decided to make a Birthday Cake for my little cousin Ella. It's her 5th Birthday today and we had a tea party for her this afternoon over in my Nana's house :) Ella's not a huge fan of chocolate but she does love fruit, so, I thought, why not make an Orange & Coconut Heart Cake? She loved it anyway, as did all of the grown-ups at the tea party :) and she had a ball :)


I used all kinds of everything to decorate Ella's cake, so you can be as creative as you like :)
I bought the flowers in a craft shop and stuck small wooden skewers into them so
that they would stick out from the cake. I also used other bits and bobs
from the craft shop to decorate - Bows, Stars & Flowers.

You will need...

FOR THE CAKE..

10oz Self Raising Flour (sieved)
8oz Caster Sugar
6oz Butter (softened)
4 Eggs
Juice of one Orange
Rind of 3 Oranges
4 tbsp Dessicated Coconut

FOR THE ORANGE BUTTERCREAM..

220g Butter (softened)
500g Icing Sugar
4tbsp Orange Juice

Use a small grater for the Orange Rind

What to do...

1) Preheat your oven to 180C/ 350F/ Gas Mark 4
2) Cream the butter and the sugar together in a mixing bowl.
3) When the mixture is nice and creamy, add in the eggs one by one, followed by the orange juice
4) Continue to mix and add in the flour, orange rind and coconut
5) When the mixture is light and fluffy, stop the mixer and leave it to one side
6) Take your 2 baking tins and grease them with melted butter. Put a piece of baking paper in the bottom of each of the tins also.
7) Pour half the mixture into each of the tins and bake for approx. 40 mins
8) When done, leave the cakes to cool on a wire rack while you make the Orange Buttercream...


For the Orange Buttercream...

1) Cream the butter and the icing sugar together with a food mixer
2) Add in the orange juice and continue to mix
3) When the mixture is really light and fluffy, stop mixing and leave it to sit for a minute

Your Buttercream should be light and fluffy 

To Assemble the Cake...

1) Spread half of the buttercream onto the top of one of the cakes - if you like, you can also add jam or marmalade
2) Sit the other cake on top and spread the remainder of the buttercream over it
3) If you like, you can sprinkle coconut over the top and sides like I did
4) You can then decorate the cake however you like :)


Ella's Tea-Party :)

Saturday, 20 April 2013

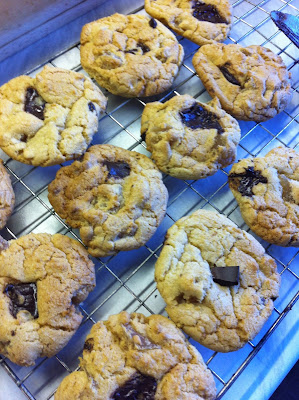
Chewy Chunky Cookies

So this weekend I wanted to move away from cupcakes, cakes and slices and try something different. I had some ginger chunks and left over Smarties from last weeks caramel squares, but, I didn't really think they'd go too well together. I eventually decided to try out a new chewy cookie recipe I found in the paper. I made two batches - one Chunky Ginger and Dark Chocolate lot & one lot with Mixed Chocolate Chips and Smarties :) So here goes...


You will need..

480g Plain Flour (sieved)
Half tsp Baking Soda
Half tsp Salt
180g Butter (Melted)
250g Brown Sugar
120g White Caster Sugar
1 tbsp Vanilla Extract
1 Egg
1 Egg Yolk
480g (ish) of Chocolate Chips or fillings of your choice

THIS MAKES APPROX. 18 COOKIES


Method...

1) Preheat your oven to 165C/ 325F /Gas Mark 3
2) Sieve the flour, baking soda and salt into a large bowl and leave to one side
3) In a separate bowl, with a food mixer, cream the melted butter, caster sugar and brown sugar together 
4) When nice and creamy, add in the egg, the egg yolk and the vanilla extract (the easiest way to separate an egg is to crack it in half drop the yolk into one side and then back into the other until all of the white has ran off)

5) Finally stir in the chocolate chips/ smarties/ nuts/ ginger (whatever you like really :)


6) Line a baking tray with greaseproof paper and put a tbsp of the mixture on the tray fro each cookie
7) Place them in the oven for 15 to 17 minutes 


Leave the cookies to cool on a wire rack so they set before eating :) 
STICKY GINGER CHUNKS


Tuesday, 16 April 2013

Smarties Covered Caramel Biscuit Squares


So I spent the majority of this Sunday at a Wedding Fair in a local hotel and while I was there, I couldn't resist sampling some delicious chocolate biscuit cake made by a local cake-maker from 
Cakes by Jonathon. But, one small sample wasn't enough for me - I decided that I was definitely heading for the kitchen to make some chocolate biscuit cake when I arrived home. However, I didn't have a huge amount of digestive biscuits so I had to stick my thinking cap on. I decided to go for these Smarties Caramel Biscuit Squares instead so I still had something chocolaty and biscuity to munch on - Yummmmyy :)


So, you will need...

FOR THE CRUMBLY BISCUIT BASE
250g Milk Chocolate or Plain Digestive Biscuits (crushed)
3 tbsp Golden Syrup
100g Butter 

FOR THE GOOEY CARAMEL MIDDLE
397g tin of Condensed Milk
100g Butter
100g Soft, Dark Brown Sugar

FOR THE SMARTIES COVERED CHOCOLATE TOP
2 tbsp Butter
250g Milk Chocolate
100g Dark Chocolate
4 Funsize Packs of Smarties (for decoration) 


You can really use whatever you like to decorate
or nothing at all :) 

Method...

FOR THE CRUMBLY BISCUIT BASE

1) Line a deep baking tray with greaseproof paper and set it aside while you make the biscuit base
2) Melt the butter in a bowl over a saucepan of simmering water
3) When melted, add in the golden syrup and stir
4) When that's combined, add in the crushed digestive biscuits and stir well
5) Empty the base mixture onto the lined tray and press it down so it occupies all of the trays space
6) Refrigerate the tray while you make the caramel


FOR THE GOOEY CARAMEL CENTRE...

1) Melt the butter in a pan on simmering heat
2) Add in the sugar and stir continuously
3) Pour in the condensed milk and continue to stir - the mixture should bubble and will begin to take on a caramely consistency, but keep stirring until it thickens
4) When thickened, take your tray out of the fridge and pour the caramel over the biscuit base
5) Refrigerate the tray again while you make the chocolate topping


FOR THE SMARTIES COVERED CHOCOLATE TOPPING...

1) Put the butter and both types of chocolate in a bowl over a pot of simmering water and stir 
2) Once fully melted, pour the chocolate mixture over the caramel layer and spread evenly
3) Sprinkle the Smarties or topping of your choice over the chocolate and refrigerate for at least an hour before attempting to slice


When the hour has passed, take the tray out of the fridge,
remove from the tray & slice.I usually slice them into small 
squares as these can be really filling, and then you can 
always go back for seconds :) 


Brought the last one to college today and ate it while
studying - Yummmmyy :) :)

Saturday, 6 April 2013

Strawberry & White Chocolate Cupcakes

So, last week was my friend Molly's Birthday and she was having a night out to celebrate but, because of work, I couldn't make it up. I thought I better make it up to her so, yesterday I baked a batch of Strawberry and White Chocolate Cupcakes and brought them up to college and she was delighted :) 

These cupcakes are quite simple to make and you can substitute the strawberries and/or the white chocolate for whatever you please :)
The strawberries can be a little sticky and messy as they sort of dissolve when they're cooking but, I still think its safe to say that everyone loved them....


Ingredients


10oz/285g Self Raising Flour (sieved) 
5oz/140g Caster Sugar
1 tsp Baking Powder
5oz /140 g Frozen Strawberries (doesn't have to be exact)
5oz /140 g White Chocolate (doesn't have to be exact)
100ml Plain Yogurt
75ml Milk 
1 Egg (lightly beaten)
1 tsp Vanilla Essence
5oz/130g Butter

Method


1) Preheat oven to 200 C/ 400 F/ Gas Mark 6
2) Put the Flour, Baking Powder, sugar, berries and chocolate in a bowl and mix
3) Melt the butter in a separate bowl over a pot of simmering water  
4) When its fully melted, take the butter off the heat and add in the Milk, Yogurt, Essence and Egg
5) Pour the wet mixture into the bowl of dry ingredients and stir briefly
6) Leave the mixture sitting and line you muffin tray with bun cases
7) Spoon approx. two spoonfuls of the mixture into each case
8) Place in oven for 20 - 25 mins until golden 
9) Dust the cupcakes with icing sugar and leave them to cool on a wire tray while you make the buttercream


For the Naturally Flavoured Strawberry Buttercream...

Cream 380g Icing Sugar and 125g Butter together in a mixing bowl.
When blended, add 2 finely sliced strawberries and mix again.
Then, using a piping bag or a spoon, ice each of the cooled cupcakes.

I used this shape piping nozzle to ice these
Cupcakes


I did have a few left over for my little cousins to try
too - I think its safe to say they liked them!!! :)


Thursday, 4 April 2013

Flour-less Chocolate Cake

So last weekend myself and the college girls decided to have a get together for a much needed catch-up. We had originally planned on having a dinner party, but in the end we decided to order a cheeky Chinese Take-Away. However, I still couldn't resist baking something Yummmmyy for dessert. I wanted to bake a proper cake and seens as it was the end of Lent and seens as all of the girls LOVE chocolate, I decided to go for a Rich Chocolate Cake.

There are two ways of making this cake - one with flour and the other without. I've started to realise over the last little while that I haven't been sharing any recipes specifically for people with allergies, so, this can be my first :)


Here goes...


Ingredients...

300g/10oz Dark Chocolate (chopped)
250g/9oz Butter (softened)
300g/10oz Caster Sugar
6 Eggs (lightly beaten)
110g/4oz Ground Almonds 

OR if you would like to use flour, use 55g/2oz Ground Almonds and 55g/2oz Plain Flour


Ground Almonds work as a substitute for Flour for this recipe

Method...

1) Preheat the oven to 160C/ 325F/ Gas Mark 3
2) Grease an 8 inch round cake tin with melted butter and also add a piece of baking paper to the bottom to make sure your cake doesn't get stuck
3) Put your chocolate, butter and sugar in a large bowl over a pot of simmering water & stir until melted
4) When the mixture is fully melted, remove the bowl from the heat and stir in the lightly beaten eggs
5) Fold in the ground almonds or your ground almonds and flour combination
6) Pour the mixture into the cake tin and bake for 40-50 minutes, until the centre is set.
7) Leave the cake to cool in the tin while you make the frosting


For the Frosting...

* You will need to melt 300g of Chocolate (dark or milk - I usually do half and half) , 90g Butter and 6 tbsp of Milk over a pot of simmering water. 

*Once all of the ingredients are combined, leave the mixture to sit until the cake is cool and you're ready to frost it.


We served the cake with both Ice-cream and Cream 


And it was devoured!!!