Showing posts with label SLICES. Show all posts

Wednesday, 7 May 2014

Exams, Exams, Exams.

It's that time of year again - the dreaded exam season. The college library is packed with exam period blow-ins, there are no books available for that one particular subject you're stuck on, assignment due dates are creeping up and everyone is stressing to the max. I used to count down the seconds until that last dreaded exam was over, but, this year, things are a little different. It's hard to believe, but I'm currently studying for my finals. This is my last... ever.... exam period. In one way I'm delighted, but in the other, extremely sad. No more heading out more nights than staying in during the week, no more skipping lectures when the sun is shining, no more chilling with the college gals after a hardcore full day session in the library - I must grow up and face the real world - what a scary idea! 


Pulling all-nighters and last minute cramming are only known too well by us final year students. We've spent three years perfecting our tactics, and, we figure that to do it right, you really do need some serious brain food. I always make sure to stock up on Berocca and vitamin C tabs, but, the most important thing for me is to eat a good breakfast and to munch on vitamin-packed snacks while I study. Having said that, chocolate and sweet treats are also important - well I like to think they are-  so check out the recipe for my trusty exam time buddies; my all time fave; Millionaire's Squares, at the end of the post. 


I can never function properly on a regular day, never mind during exam period, without a good breakfast in my belly. Here are a few samples of what I munch on each morning before I get to work...


A nice big bowl of porridge topped with strawberries, blueberries, raspberries and Eucalyptus honey - it always does the job and keeps me going well into the day.


Vitamin packed blueberry and kiwi smoothies
To make these tasty treats simply blend...

1 Banana
 2 Kiwis
250g Blueberries
3 tbsps of Natural Yogurt
100ml Apple Juice
Small cup of Crushed Ice

... serve chilled, and enjoy! This smoothie is also perfect as a mid-study snack. It's full of vitamins and good sugars and, will keep you feeling wide awake while you work.


Granola topped with everything I can get my hands on! 
Natural Greek yogurt, raspberries, grapes, banana, almonds, dark chocolate chips, pumpkin seeds and honey - throw anything on top, it'll be delicious!


A breakfast feast; American Style Blueberry Pancakes topped with banana, maple syrup and strawberries. These have to be my favourite thing to munch on over breakfast, but, they do take a little longer than others to prepare. 

Ingredients

260ml Milk
270g Plain Flour
2 tsp Baking Powder
4 tbsp Butter (melted)
2 Large Eggs
4 tbsp Caster Sugar
Handful of Blueberries

Method
1) Whisk the milk, eggs and melted butter together in a jug
2) Sieve the flour and baking powder into another bowl, mix and then combine with the wet mixture using your electric mixer
3) Melt a tsp of butter and a few drops of coconut oil in a pan, spoon one ladle of the mix onto the pan and, using your spatula, shape into a circle.
4) Stick 4-5 blueberries on top of the pancake before you flip and make sure both sides are evenly cooked
5) Serve topped with banana, strawberries and maple syrup.


Porridge topped with apple, blueberries, flaked almonds, cinnamon and honey - another delicious breckie that will keep you feeling full well into the day.


Carrot and Passion Fruit Smoothie - another delicious smoothie that is packed full of energy boosting vitamins. It'll leave you raring to go! Simply blend...

1 Banana
1 Pear
1 Carrot 
1 Passion Fruit
1 Cup of Orange Juice
Half a cup of Crushed Ice

... serve chilled and enjoy.


Toast with my one true love; peanut butter and banana sliced on top. This may not be as filling a breakfast as some of the others but it's seriously delicious. 


The Trusty Study Buddy

I seem to make these bad boys every time exam period comes around. I know I said that healthy food is key, but, I think we all need a little comfort food at this time of year too!Just click on the name above for the easy recipe.


I'm going to miss spending every day with these pals for sure..
Now I must get back and study - wish me luck!


Thursday, 19 September 2013

Mars Bar Krispie Squares

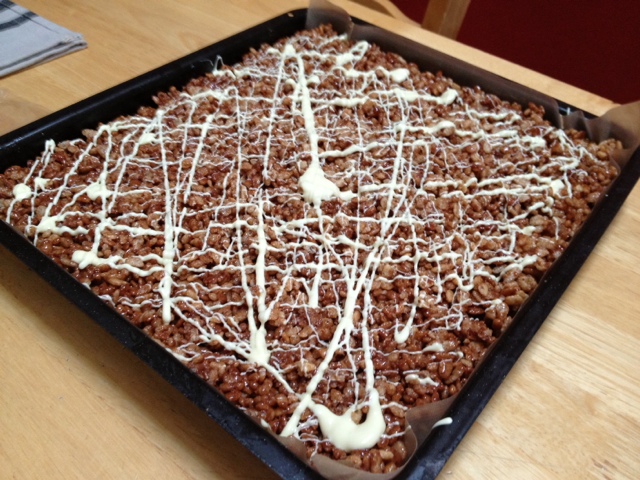
Mars Bar Squares are definitely one of my faves and they are SO easy to make it's ridiculous -- They're basically a Rice Krispie Bun, but instead of using plain chocolate you use Mars Bars and instead of putting them in individual bun cases, you let them cool in a tray and then cut them into squares. They're ideal for bringing on picnics, for kids parties or even for having out on the table when guests are over. BEWARE - they're ridiculously tasty, once you take your first bite you might not be able to stop!!! 


I use the Avoca recipe for my squares which I adapt slightly by using white chocolate drizzled on top instead of a later of milk and by adding a few other extra touches.


Ingredients

200g Butter
200g Rice Krispies
1 tbsp Golden Syrup
8 Lg Mars Bars
100g White Chocolate (for top)


Method

1) Prepare your baking tray by lining it with greaseproof paper.
2) Melt the butter in a large saucepan over a low heat.
3) When fully melted, add in the golden syrup.
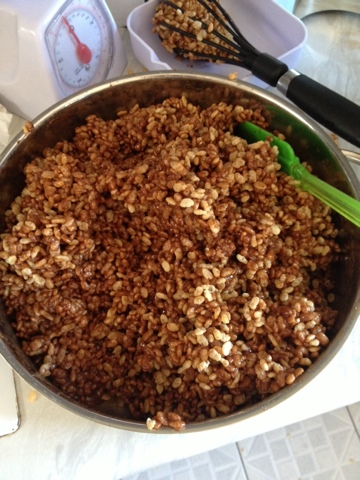
4) When combined, add in the broken Mars Bars and begin to whisk gently to combine (this may take a while so be patient) 


5) When the majority of the lumps have dissolved, turn off the heat.
6) Pour half the Rice Krispies into a separate large bowl, pour half the chocolate mixture over them and stir until all Krispies are covered.


7) Empty the combined mixture into your lined baking tray and to the same with the remaining half of the Krispies and mixture. 
8) Flatten the mixture in the tin and refrigerate for at least half an hour. 
9) When cooled, you can melt the white chocolate (I find the easiest way to do this in the microwave - stop and stir after every 30 seconds) 
10) Using a spoon drizzle the white chocolate over the Krispies in a zig zag motion.

11) Refridgerate again for a further 30 mins and then slice it into whatever shapes and sizes you wish.

I doubled the mixture so the measurements above will make half the amount pictured :)

Sunday, 15 September 2013

Orange Butter Cream Squares

My triplet brothers made their debs a few weeks ago, and, being typically Irish, Mam asked me to make a few bite-size treats as their three dates plus their families would be arriving up the house. I decided to go for bite-size Mars Bar Squares and Orange Butter Cream Squares. Both were extremely easy to make and they went down a treat :) 


Ingredients

(FOR THE CAKE)

225g Butter (softened)
225g Caster Sugar
225g Self Raising Flour (sieved)
4 Eggs
Zest of 2 Oranges

(FOR THE BUTTER CREAM)

100g Icing Sugar
50g Butter (softened)
1 tbsp Orange Juice


Method

I never used to weigh up all of the ingredients before starting to get to work which was a bad move. Whenever I bake now, I weigh up everything beforehand which I highly recommend you do :)

1) Preheat your oven to 180C/ 350F/ Gas Mark 4
2) Line an approx. 30 x 30 cm flat baking tray with greaseproof paper .
3) Using an electric beater, cream the butter and sugar together.
4) When light and creamy, add in the eggs one by one and continue to beat.
5) Add in the sieved flour bit by bit and beat until the mixture is light and fluffy.
6) Then add in the orange zest and mix through.
7) Pour the mixture into the flat tin and put it in the oven.
8) After 20 mins check the cake (it should be golden brown, but if not bake for further 5-10 mins)
9) Leave the cake to cool on a wire rack while you make the butter cream.


10) Cream the soft butter and icing sugar together using an electric mixer until its really light and fluffy - BE PATIENT, it could take a while!!
11) Add in the orange juice and continue to beat through.
12) Leave the butter cream to sit while you cut the cake into small squares.
13) Then using the star shaped piping nozzle, pipe a small amount of the butter cream onto each piece of cake.

When serving, I like to dust over he squares with icing sugar - It makes them look that little bit prettier and it covers up any little mistakes ;) 


Tuesday, 18 June 2013

Millionaire's Squares

So last week in work I baked the Toffee Shortbread slices which I absolutely LOVE. But, I was really disappointed when I finished that I didn't get to gobble one up. So when I got home I decided that I had to make something similar. I didn't use the same recipe as they use in work, instead I adapted BBC Good Food's recipe for Millionaire's Shortbread. Here goes...


Ingredients

FOR THE SHORTBREAD...

250g Plain Flour
75g Caster Sugar
175g Butter (softened)

FOR THE CARAMEL...

50g Butter
50g Margarine
100g Brown Sugar
3 tbsp Golden Syrup
2 397g tins of Condensed Milk

FOR THE TOP...

100g Milk Chocolate
100g Dark Chocolate

Method

1) Preheat your oven to 180C/ 350F/ Gas Mark 4 and line an approx. 13 x 9 inch swiss roll tin with grease proof paper
2) For the shortbread, put  the flour, caster sugar and butter in a bowl and mix with your fingers until it looks like breadcrumbs
3) Continue to knead the mixture until it takes on a doughy consistency 
4) Press the shortbread mixture into the baking tin and prick a couple of times with a fork
5) Bake it for 20 mins and when done, leave it to cool in the tin


6) For the caramel, melt the butter and sugar together in a pan
7) When combined, add in the golden syrup and the condensed milk and stir continuously
8) Bring the mixture to the boil and then allow it to simmer for 5 mins until it becomes thicker
9) Pour the caramel over the layer of shortbread and leave it to cool for 5 mins and then refrigerate for 20 mins


10) When the caramel is ready you can begin to melt the milk and dark chocolate together in a bowl over a pot of simmering water
11) When combined, spread the chocolate over the caramel and refrigerate for another 20 mins


* For best results, leave the tray in the fridge over night before slicing *


I didn't leave mine over night and they cracked and crumbled.
They still tasted delicious but they didn't look quite as nice!


Tuesday, 16 April 2013

Smarties Covered Caramel Biscuit Squares


So I spent the majority of this Sunday at a Wedding Fair in a local hotel and while I was there, I couldn't resist sampling some delicious chocolate biscuit cake made by a local cake-maker from 
Cakes by Jonathon. But, one small sample wasn't enough for me - I decided that I was definitely heading for the kitchen to make some chocolate biscuit cake when I arrived home. However, I didn't have a huge amount of digestive biscuits so I had to stick my thinking cap on. I decided to go for these Smarties Caramel Biscuit Squares instead so I still had something chocolaty and biscuity to munch on - Yummmmyy :)


So, you will need...

FOR THE CRUMBLY BISCUIT BASE
250g Milk Chocolate or Plain Digestive Biscuits (crushed)
3 tbsp Golden Syrup
100g Butter 

FOR THE GOOEY CARAMEL MIDDLE
397g tin of Condensed Milk
100g Butter
100g Soft, Dark Brown Sugar

FOR THE SMARTIES COVERED CHOCOLATE TOP
2 tbsp Butter
250g Milk Chocolate
100g Dark Chocolate
4 Funsize Packs of Smarties (for decoration) 


You can really use whatever you like to decorate
or nothing at all :) 

Method...

FOR THE CRUMBLY BISCUIT BASE

1) Line a deep baking tray with greaseproof paper and set it aside while you make the biscuit base
2) Melt the butter in a bowl over a saucepan of simmering water
3) When melted, add in the golden syrup and stir
4) When that's combined, add in the crushed digestive biscuits and stir well
5) Empty the base mixture onto the lined tray and press it down so it occupies all of the trays space
6) Refrigerate the tray while you make the caramel


FOR THE GOOEY CARAMEL CENTRE...

1) Melt the butter in a pan on simmering heat
2) Add in the sugar and stir continuously
3) Pour in the condensed milk and continue to stir - the mixture should bubble and will begin to take on a caramely consistency, but keep stirring until it thickens
4) When thickened, take your tray out of the fridge and pour the caramel over the biscuit base
5) Refrigerate the tray again while you make the chocolate topping


FOR THE SMARTIES COVERED CHOCOLATE TOPPING...

1) Put the butter and both types of chocolate in a bowl over a pot of simmering water and stir 
2) Once fully melted, pour the chocolate mixture over the caramel layer and spread evenly
3) Sprinkle the Smarties or topping of your choice over the chocolate and refrigerate for at least an hour before attempting to slice


When the hour has passed, take the tray out of the fridge,
remove from the tray & slice.I usually slice them into small 
squares as these can be really filling, and then you can 
always go back for seconds :) 


Brought the last one to college today and ate it while
studying - Yummmmyy :) :)

Thursday, 21 February 2013

Gooey Caramel Biscuit Squares

We had loads of left over biscuits at home from Christmas (all the ones that nobody really likes) so, instead of leaving them sitting there for ages, I decided to make something with them... I was going to make an ordinary biscuit cake but I felt like making something a bit different. I saw that we had a tin of evaporated milk and decided to go for gooey caramel slices covered in chocolate...


INGREDIENTS
For the Biscuit Base...

500g of Biscuits of your choice (I used anything and everything: Digestives, Nice, Fox's Creams & more)
100g Butter
250g Milk Chocolate
2 tbsp Whipping Cream
2 tbsp Golden Syrup

METHOD
1) Line a baking tray with grease-proof paper
2) Crush the biscuits (easiest way is to put them in a plastic bag and crush them with a rolling pin)
3) Place the butter and chocolate in a bowl over a pot of simmering water and stir until melted
4) When melted, remove from heat and stir in the cream and golden syrup
5) Then add in the crushed biscuits and mix
6) Empty the mixture onto your lined tray and flatten
7) Stick it in the fridge while you make everything else (leave it for at least half an hour before pouring the caramel on)

INGREDIENTS
For the Caramel...

400g (1 tin) of Condensed Milk
200g Brown Sugar
200g Butter

METHOD
1) Melt the butter in the pan with the brown sugar
2) When melted and combined, add in the condensed milk and stir continuously as it starts to bubble
3) The consistency will start to change. When it gets thicker, turn off the heat and keep stirring (it shouldn't be too runny)
4) Pour the caramel over the chocolate biscuit base and refrigerate again


 Melt 400g of Milk Chocolate in a bowl over a pot of 
simmering water and spread it over the caramel 
and refrigerate again for at least 2 hours before eating.