Thursday, 17 April 2014

Chocolate Caramel Cupcakes

I absolutely LOVE caramel, so, when Mam arrived home from the supermarket with a few tins of condensed milk I had to make something delicious with it. I always tend to go for Millionaire's Squares or Banoffee, but this time I was adamant to try something else. Mam has been raving about these Caramel Cupcakes she saw on Bakery Boss, so, I decided to try something new and invent my own Chocolate Caramel Cupcake. Despite what you may think, the cupcakes aren't heavy in the slightest. Both the sponge and the butter cream are light and airy which allows for the devilish caramel.


Ingredients
MAKES 12 CUPCAKES

FOR THE CAKE MIX

225g Butter (softened)
225g Caster Sugar
225g Self Raising Flour (sieved)
2-3 tbsp Cocoa Powder
4 Eggs

FOR THE CARAMEL

1 x 397g tin of Condensed Milk
1 tbsp Golden Syrup
50g Brown Sugar
30g Butter

FOR THE CHOCOLATE BUTTER CREAM

150g Butter
300g Icing Sugar
50g Dark Chocolate (melted)
2 tsp Boiling Water

Method
FOR THE CAKE MIX

1) Preheat the oven to 180C/ 350F/ Gas Mark 4 and line your muffin tray with bun cases
2) Cream the butter and sugar together in the electric mixer
3) Once a pale colour, add in the eggs, one at a time and continue to beat
4) Once combined, add the sieved flour, one spoon at a time as you beat
5) Then add the cocoa powder in beat again until all ingredients are combined
6) Put 1-2 spoons of the mix into each bun case and place in the oven for approximately 15 mins until the cupcakes are firm and spring up when touched
7) Leave to cool on a wire tray while you get to work on the caramel and the butter cream

FOR THE CARAMEL

Firstly, you can cheat a little and buy a tin of caramel - it works just as well.
 But if you feel like going all out follow these simple steps...

1) Melt the butter and sugar together in a pan over a low heat
2) When combined, add in the golden syrup and the condensed milk and stir continuously
3) Bring the mixture to the boil and then allow it to simmer for approx. 5 mins until it becomes thicker
4) Fill a piping bag with the caramel and stick the nozzle into each bun and squeeze
5) Then leave the buns to sit and use any left over caramel for decoration later


FOR THE CHOCOLATE BUTTER CREAM

1) Cream the butter and icing sugar together in the electric mixer (be patient this may take a while)
2) When light and fluffy, add in the melted dark chocolate, one tsp at a time and beat 
3) When combined, add the boiling water, again, a small amount at a time and beat
4) Using your piping bag, pipe the butter cream onto each of the cupcakes, covering the caramel
5) After making sure that the leftover caramel is cool, you can drizzle a small amount over each of the cupcakes for a nice effect.


ENJOY 

Wednesday, 16 April 2014

Carrot & Passion Fruit Smoothie

I woke up feeling a little under the weather this morning and decided that I needed to make myself some sort of vitamin packed breakfast. I thought of topping porridge with the usual chopped fruit and berries but instead I rooted through the fridge and pulled out a few carrots, pears and passion fruits and decided to whip up a pick-me-up smoothie. Blended carrot didn't sound overly appetizing to me, but, to my surprise this strange creation proved me wrong. This smoothie, packed full of vitamins, left me feeling ready to tackle my final semester assignment mountain.

 I'll just say one thing; don't knock it 'til you try it!


Ingredients 
SERVES 4

2 ripe bananas 
2 pears 
2 carrots
2 passion fruits 
2 cups orange juice
1 cup crushed ice
Mint leaves (to serve)


Method

There's not really much to making this smoothie 
- you pretty much whack everything in the blender, but here goes... 
just in case...

1) Peel and chop all fruit and veg and add to the blender 
2) Add the orange juice and blend on medium speed until smooth
3) Add in the crushed ice, blend again and, hey presto there's your super healthy vitamin packed smoothie - enjoy!


Saturday, 5 April 2014

Calling All Coffee Lovers

Coffee Cake is Mam's all-time favourite dessert, so last week for Mother's Day, I decided to try something different and whip up a batch of Coffee Cupcakes. I usually use IREL Coffee Essence which you can only buy in Ireland, to flavour coffee cake, but seens as the number of Yummmmyy's international followers has increased greatly over the past few months, I thought that I better try to create a new way of achieving that moreish coffee taste. I decided to experiment and used instant coffee mixed with a tiny amount of boiling water which formed a coffee paste. To my delight, the paste worked perfectly and the cupcakes tasted just as good, if not better than before. 


Ingredients
FOR THE CAKE MIX

225g Caster Sugar
225g Butter (softened)
225g Self Raising Flour (sieved)
3 tbsp Instant Coffee
1 tbsp Boiling Water
4 Eggs

FOR THE COFFEE FROSTING

200g Icing Sugar
100g Butter (softened)
3 tbsp Instant Coffee
1 tbsp Boiling Water


Method
FOR THE CAKE MIX

1) Preheat your oven to 180C/ 220F/ Gas Mark 4 and line your muffin/ cupcake tin with bun cases
2) Cream the butter and sugar together in the electric mixer (make sure you allow it to mix until fully combined and lighter in colour)
3) Add in the eggs, one by one and continue to beat
4) When combined, begin to add the sieved flour, again, one spoon at a time - allow the mixture to beat until it is light and smooth 
6) In a cup, mix the 3 tbsp of instant coffee with the 1 tbsp of boiling water and then add it to the bowl and beat again until combined (you can gibe the mix a stronger coffee flavour if you like simply by making more paste and adding it to the mix, but, be careful not to make it too strong)
7) Fill each bun case with roughly one tbsp of the mix and bake for approx 20 mins until the buns are golden brown


Method
FOR THE COFFEE FROSTING

1) Cream the butter and icing sugar together in the electric mixer until smooth and light in colour
2) Add 1-2 tbsps of boiling water and continue to mix
3) Again, in a cup, mix 3 tbsp of instant coffee and approx 1 tbsp of boiling water and then add it to the bowl and continue to mix
4) Decorate the cupcakes as you wish - I piped the coffee frosting, but, you could just as easily use a spoon to spread it on top.


Thursday, 27 March 2014

Easy Peasy Pavlova

I've been baking for a while now but this, believe, it or not, was my first attempt at a meringue of any kind. To my surprise, it might actually have been the simplest thing I have ever made. There's not really much to it but it looks fantastic served at any occasion. Any amateur baker could whip up something spectacular by following this super easy recipe. I decided to top the pavlova with fresh cream and summer berries which went down a treat at home. Dad, who isn't usually too keen on dessert even went back for a second piece - I think that says something!


Ingredients

12 Egg Whites 
345g Caster Sugar
345g Icing Sugar
Fresh Cream
Berries of your choice 


Method

1) Preheat your oven to 100C and line a baking tin with greaseproof paper 
2) Using your hand mixer, beat the egg whites in a clean metal bowl until they resemble clouds and stand in stiff peaks when the beater is lifted 
3) Add the caster sugar slowly, one spoon at a time as you continue to mix until all is the caster sugar has been added. The recipe should be thick and glossy when done
4) Then sieve a quarter of the icing sugar into the bowl and, using a metal spoon, fold it in. Repeat this until all the icing sugar has been added. 
5) Then using your spatula, spoon the majority of the mixture onto the lines tray and spread. If you like you can then use a piping bag to pipe the remaining mixture around the edges


6) Bake for 1 hour and 20 mins @ 100C and leave to cool before assembling 
7) Spread the cream over the base, top with berries and serve - enjoy!! 


Saturday, 22 March 2014

Barcelona Baby

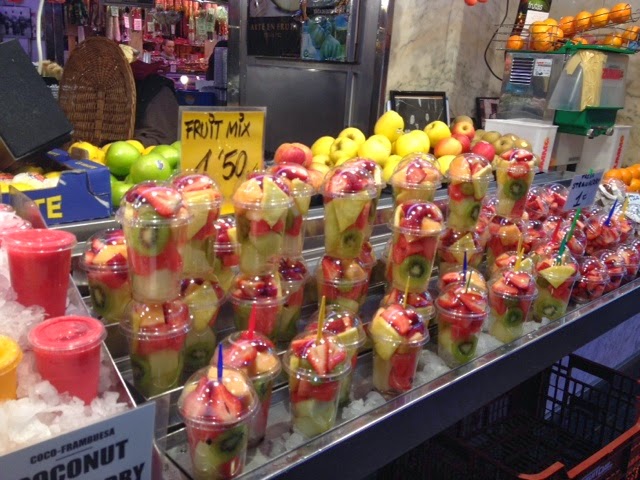
I was well and truly spoiled rotten last week when my fab boyfriend Dave whisked me off to beautiful Barcelona for the long weekend. We explored the absolutely gorgeous city for three brilliant days and were blown away by its stunning Gothic and modern architecture, friendly people and, most importantly, the fabulous food! We ate Tapas, drank Champagne Sangria, and, became obsessed with the city's incredible food market, which was definitely the highlight of the trip. Stalls stacked with chopped fresh fruit, fresh smoothies and fruit juices, meats, vegetables, artisan chocolates, macaroons, caramelized nuts and so much more lined the market space. The buzz was incredible with locals haggling with the tenders and tourists making their way through the hustle and bustle of the place. 


I couldn't get enough of the cups of chopped fresh fruit and delicious smoothies. We walked down to the market each morning for breakfast and its safe to say that I was actually in Heaven.


The coated nuts, artisan chocolates and macaroons were absolutely delicious. I got a little carried away and spent €30 on nuts alone the first day that we visited the place. But, in fairness, who could resist?


The Champagne Sangria was delicious but, beware, its a bit stronger than you may be used to! Cointreau, Honey Rum and fresh lemon and orange are added to the champagne which makes it pretty hard to resist. 


Take it from me, Barcelona is a must see city for anyone with an interest in culture, architecture and most importantly - food.

Tuesday, 11 March 2014

Mississippi Mud Pie

South Carolina was the place to be last summer when myself and a bunch of friends traveled over to the states on a J1 visa. While there, my keen interest in food and baking had me trying every tasty treat that my broke Irish behind could afford to sample. Although the dessert doesn't originate in South Carolina, my all time favourite had to be Mississippi Mud Pie. This traditional southern dessert with it's rich chocolaty filling and it's whipped cream topping will have you feeling guilty for a week after eating a slice but believe me, it's well worth it! I've baked the dessert on a couple of different occasions since I've been home, and, each time, the delicious smell of the pie in the oven brings me straight back to that sunny southern state. 


You might have guessed that the dessert in question is in fact the infamous pie featured in The Help, but, you'll be extremely glad to know that unlike Mini's, my mud pie doesn't have a horrendous secret ingredient! 


Recipe adapted from Love Food's gorgeous book 'Bake'.


Ingredients 

FOR THE BASE

175g Plain Flour (sieved)
25g Cocoa Powder (sieved)
40g Light Muscovado Sugar
85g Butter (softened)
3 tbsp Cold Water 

FOR THE FILLING

85g Dark Chocolate
85g Butter 
85g Light Muscovado Sugar 
2 eggs (lightly beaten) 
100ml Whipping Cream 
1 tsp Vanilla Extract 

FOR THE TOP

250ml Whipping Cream
100g Dark Chocolate 


Method 

1) Preheat your oven to 200C/ 400F/ Gas mark 6 and grease your round tart dish with melted butter
2) The water for the pastry works best when it's really cold so place a small glass of water into the freezer at the beginning 
3) Sift the flour and cocoa powder into a large bowl and stir in the sugar 
4) Add the butter, and, using your fingertips rub the butter into the mixture until it resembles small breadcrumbs 

5) Add the tbsps of water until the mixture binds a dough 
6) Roll the dough out onto a lightly floured surface - make sure that it's large enough to cover your pie dish 
7) Prick the base multiple times with a fork, cover with greaseproof paper, and fill with baking beans. If you don't have baking beans, simply sit a small plate on top and bake in the oven for 10 minutes
8) After the 10 minutes have passed remove the base from the oven and reduce the temperature to 180C/ 350F/ Gas mark 4
9) For the filling, melt the chocolate and butter in a saucepan on a low heat
10) Whisk the sugar and eggs together until smooth and then stir into the chocolate mixture along with the cream and the vanilla extract 
11) Pour the mixture over the base and bake for 20-25 minutes until firm


12) When ready, leave to cool while you whip the cream 
13) When the tart is fully cool spread the cream over the filling. Then drizzle melted chocolate over the cream using a spoon or, if you want to be extra fancy, fill a plastic food bag with the chocolate, pierce it with a cocktail stick and squeeze the chocolate over the top. 

Serve chilled and enjoy!

Monday, 3 March 2014

Horaaaay For Pancake Tuesday!!!

You might call me an overgrown child, but my eyes light up at any mention of pancakes, and, Pancake Tuesday is definitely one of the highlights of my year! The tradition of Pancake Tuesday or Shrove Tuesday, dates back to the beginning of the Christian festival of Lent, when, for 40 days, in the days leading up to Easter Sunday, Christains resisted eating any 'luxury' food. Christians made pancakes in order to use up any 'luxury' items and also to resist temptation throughout Lent. Pancake Tuesday is still celebrated in many countries around the world, not only by Christians. 


I'm a huge fan of pancakes of all kinds - traditional style, American style and crepes, however, on Pancake Tuesday I always stick to the traditional....


TRADITIONAL CREPE STYLE PANCAKE BATTER 
Makes approx. 12 Pancakes 

Ingredients 
300ml Milk
4oz Plain Flour (sieved)
2 Eggs
Pinch of Salt 

Image from theDailyShift.com


Method
1) Lightly whisk the eggs, salt and flour together in your mixer
2) Gradually add the milk as you mix
3) Leave the mixture to sit for at least half an hour before making the pancakes
4) Put your pan on the ring and melt one tsp of butter and a few drops of oil 
5) Spoon one ladle of batter onto your heated pan cook evenly on both sides 

Image from theSkinnyDollsJourney.blogspot.com

Some of you might prefer the slightly thicker American style pancake so, just for you...


AMERICAN STYLE PANCAKE BATTER
Makes approx. 12 pancakes

Ingredients 
260ml Milk
270g Plain Flour
2 tsp Baking Powder
4 tbsp Butter (melted) 
2 Large Eggs

4 tbsp Caster Sugar


Method
1) Whisk your milk, eggs and melted butter together in a bowl / jug
2) Sieve your flour and baking powder into another bowl, mix and then combine the wet with the dry using a handheld mixer 

3) Put your pan on the ring and melt one tsp of butter and a few drops of oil

4) Spoon one ladle of the mix into the pan and using your spatula, shape the mix into a round shape

5) Flip until both sides are evenly cooked


To name a few of my favourite toppings....

> Nutella and Strawberries 
> Maple Syrup and Pecan Nuts 
> Nutella and Coconut
> Nutella and Icecream 
> Fresh Orange Juice and Sugar
> Ice cream and Baileys